I want to create every day...but I do not have the time...If I manage with my schedule...I don't get the space..family..work..cooking list is endless.
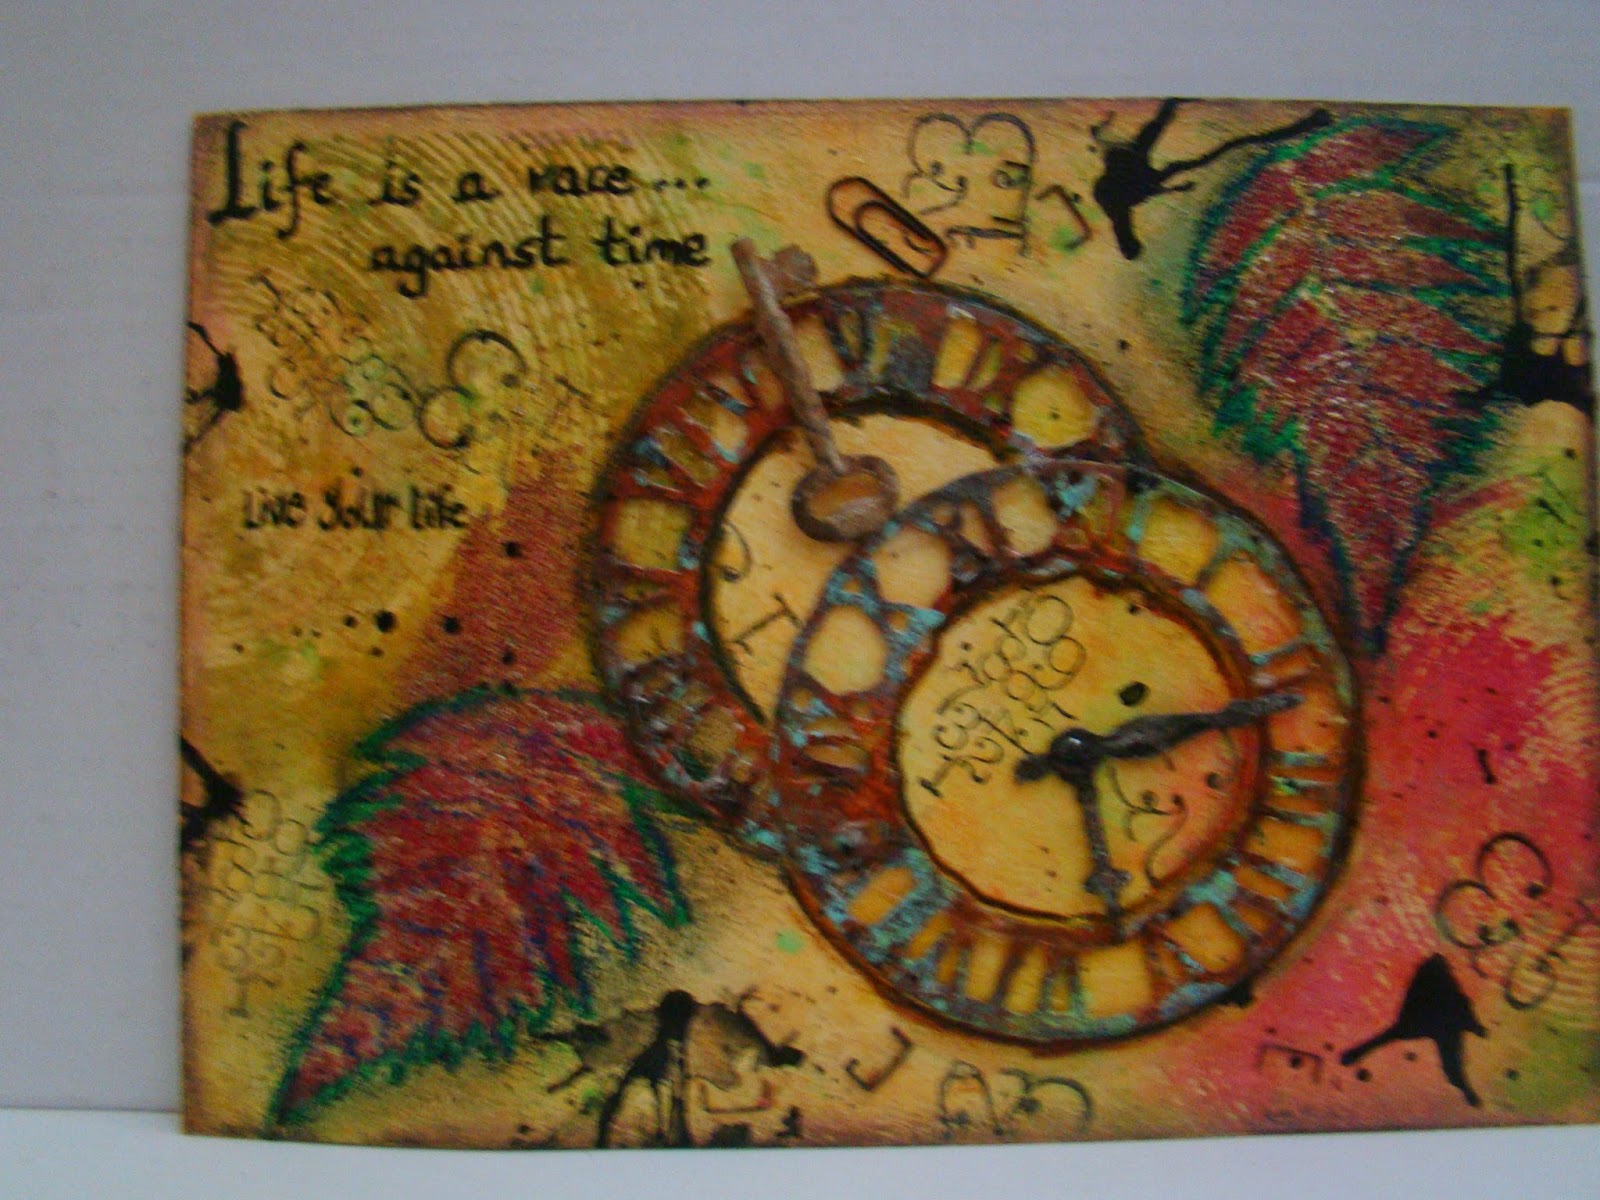
So my art journal page of today... Life is a race... against time.
Step 1...Getting Ready:
Gesso the page always. I love to Gesso using bath sponge cut into pieces..and I can use each side for different colors..and to create texture.
Die cut using Tim Holtz Weathered Clock ...need two
Step 2...Background preparation:
Use any water color paint..The technique is to drop the paint then smudge/spread using bath sponge. Colour is Yellow..a) let the Yellow drops dry a bit on its own then b) use Distress Paint Scatters Straw and dab/smudge using sponge c) drop orange water color drops d) then Green water color drops dab/smudge using sponge.
Now your background is ready...
seal the background using any Gel Medium
Step 3 - Stencil
I used Memory Box Radio Waves using two colors.. Peeled Paint and Deep Red bright home made spray.
Step 4 - Embossing
Tip: In order to emboss you need a paint that doesn't dry fast you can use pigment paint or acrylic paint and you can use ANY color because the paint will be covered by the powder.
I used TCW 6x6 Template - Mini Bamboo covered the area with acrylic paint then used
Stampendous - Aged Scarlet - Embossing Enamel - FREG039 then scattered
Distress Glitter - Mustard Seed
Tip: for Stampendous powder..Heat from down and press down the powder to prevent it from flying..I was a bit impatient plus my paper was 300 gsm so it was taking time so tried from up and lo the powder flew.
I love Stampendous powder as its mixed with gold (twin colors)
Don't know why the background appears to be more green
Then I outlined the embossed area using paint marker and china marker ..then smudged a bit with my finger.
Step 5 - Painting the die cut giving it the antique look
first I cut the die
Then I used Distress Paint (Antiqued Bronze), any brand Black Acrylic and Martha Stewart Beach Glass
I was so engrossed that I didn't realize the opened the paint bottle and spilled almost 3/4 Distress Paint (Antiqued Bronze) paint...but I didn't panic..used my bath sponge pieces which absorbed the paint and i could squeeze it back in the bottle... Did it ever happen to you?
TIP: so that I don't ever repeat this mistake again. I taped the bottle...as getting craft stuff is very, very expensive here and it takes a long time ..as I live in UAE.
After covering with bronze while semi dry dab a bit using sponge with black acrylic paint
then dab beach glass
If the blue color is more dab again Bronze color followed by black. Then you will get the perfect Faux RUST look.
to paint the hands...first scrap the hour hand with sand paper then paint using only black acrylic paint. This will give it a rust/antique look.
Step 6 - Final touches
I glued home-made rusted staple pins and clips on the background.
Then I used stamps of numbers ..don't remember the name.
then
Spattered black acrylic paint diluted with water.
Wrote the text using paint markers...honestly never liked my handwriting..but cant use stickers all the time..Got to love my handwriting ..but I can't.
TIP: At some places drop just one big drop of paint..then go near it and blow in different direction..you will get beautiful spattered effect.
Then glued the antiqued die cuts and placed the hour hands using brad..painted the brad with black then scraped the tip.
Outlined the page using Faber-Castell Gelatos
Final Seal using fixative or rub candle.
the result is fabulous. I tried two version one using home-made rust key and the other hour hands. I liked both.
TIP: I always work on a separate sheet of art paper of 300 gsm then once final paste the sheet in my Art journal.
Do let me know how you liked my art journal.